Azure Cloud Structure
The first actual post about Azure! This one is still going to be boring, though.
You can start using Azure without knowing how it’s all organized, but it helps to understand this stuff. Microsoft has a ton of documentation about the Azure hierarchy in their Cloud Adoption Framework, but reading this is like reading Cold Mountain: it’s tedious and afterwards you’re not sure you understood it (I make no apologies). So let me give you the quick explainer by using Microsoft’s helpful image.
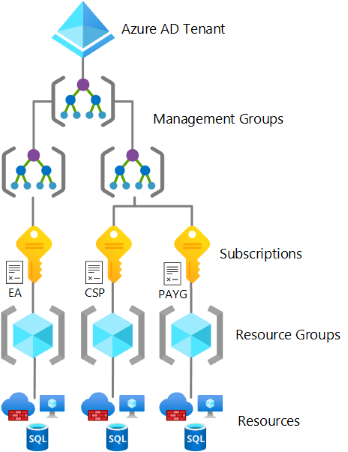
Most documentation will start at the top and go down. But I think it makes more sense to start at the bottom with what you’ll use the most: resources.
Resources
Resources are the actual things you create in Azure. They’re what the cloud is all about. Your VMs, databases, storage accounts, Web Apps, virtual networks, monitoring tools, containers, machine learning and AI nonsense… there are so many things!
Resource Groups
Resource groups are a way for you to group your Azure resources together. You can think of them like a folders in a file system except that resource groups can’t be nested (so you can’t have “subfolders,” to extend the analogy).
You can organize resource groups however you want, but the best practice is to put resources that should have the same lifecycle in the same resource group. In other words, resources that should live and die together should be in the same resource group. What that means to you will totally depend on your situation, but here are some examples.
Example: Short-Lived Resources
You have a development environment that you want to spin up dynamically, maybe for a day every two weeks. This development environment is made up of a SQL Server and a web API running on an Azure Web App. You can put all the resources related to that development environment in the same resource group. When you’re done for the day, you can delete the entire resource group which will delete all the development resources (SQL Server and Web App) in the process.
Example: Three-Tier Architecture
You have a common three-tier architecture in production: database, API, and web front-end. Each tier will have its own lifecycle so you put each tier in its own resource group.
| Resource Group Name | Resources |
|---|---|
| rg-data | SQL Server Managed Instance |
| rg-api | Web App running .NET and Web App Service plan |
| rg-web | Web App running PHP and Web App Service plan |
Let’s say you get a new CTO who says Go is the new, hip language and cajoles the engineering department to rewrite all the APIs in Go. You can create a new resource group named rg-api-go and when it’s working, you can delete the rg-api resource group. If you kept it in the same resource group, you’d have to figure out which resources are no longer needed and then delete them. Organizing by workload makes your job a little easier.
Notice that the Web Apps and Web App Service plans are located in the same resource groups. For the most part, you can put any resource in any resource group, but Web Apps are an exception and must in the same resource group as their dependent Web App Service plans.
Example: Region
If you’re working in multiple regions, you may want to have resource groups for each region. Often this approach is used in combination with your existing strategy. So in the example above, you may end naming your resource groups as such:
- rg-data-eastus
- rg-data-westus
- rg-api-eastus
- rg-api-westus
- rg-web-eastus
- rg-web-westus
Subscriptions
Subscriptions are the things that contain your Azure resources. Most importantly, subscriptions are the way billing is handled. Each subscription is billed separately.
When you start out, you’ll have just one subscription and that will likely be all you need. There are a few reasons you may want to have multiple subscriptions and it pretty much all depends on your billing preferences. Here’s some examples of why you’d want different subscriptions.
- A company has subsidiaries, and each subsidiary should be billed separately for accounting purposes. In that case, each subsidiary would have its resources in its own subscription.
- Azure has several subscription types known as subscription offers. One of them is a Dev/Test subscription which has cheaper pricing for your non-production resources. If you would like to spend less money for the resources that aren’t actually generating money for your organization, consider creating a Dev/Test subscription.
- You’re an overachiever and you want to create a “proper” landing zone configuration.
Subscription Offers
If you go to the subscription offer link, you might be overwhelmed with the different offers. I won’t go over all of them, but I’ll point out the ones that are of most interest.
- Free Trial: When you sign up for a brand new Azure subscription, you’ll be pushed to the free trial, which gives you $200 in credits your first month. After that month is up, you’ll need to convert it to a different subscription offer to keep using it.
- Pay-As-You-Go: This is the most basic offer, which is exactly as it sounds: you pay for the resources you create and don’t pay after you delete those resources.
- Visual Studio: If you are a Visual Studio subscriber, you can create your own subscription with free credits attached to it. This is great if you’re a developer and want to spin up a few resources for testing without getting approval from your organization. There are different Visual Studio offers based on your Visual Studio subscription level.
-
Dev/Test: Cheaper pricing as discussed in the main Subscriptions section

- Students: If you are a student, you can get a subscription with some free credits.
The rest of the types are either Azure support plans, enterprise for very large companies that will usually be working directly with a Microsoft representative, companies that resell Azure services, legacy plans (such as BizSpark), or things that I don’t know and frankly don’t want to know.
How Many Subscriptions?
Okay, I said earlier that you’ll probably only need one subscription and I stand by that, but I should highlight that this is in contrast from Microsoft’s recommendations. Read their subscription democratization documentation if you can stomach the Gartner-esque language, but let me translate: Microsoft suggests you create subscriptions for each business unit. This is recommendation is part of their landing zone guidance, and you should read that before deciding if you want to have multiple subscriptions.
Microsoft says that each business unit will have more control over their own subscription, which is true but if you’re talking purely access control then there are ways to easily grant access to resource groups if you’re properly using infrastructure as code. Here’s the major downside to multiple subscriptions: not all resources can be moved to a different subscription. So in many cases, if you decide that a resource should be in a different subscription, you’ll have to create the resource in the other subscription and then delete it from the old subscription. (Microsoft has a list of resources that can be moved.)
I can’t give you the correct answer for your organization, but my advice is that you read about landing zones, give it some serious thought and discussion with stakeholders, and then decide if there is a justification for multiple subscriptions. The larger your organization, the more likely the answer is yes.
Management Groups
Management groups are a way for you to group subscriptions together. The reason for this is to restrict access or enforce specific policies for a group of subscriptions. This is useful if you’re in a large organization or if you’re using landing zones.
Tenant & Entra ID
An Azure tenant is the highest level of Azure. It represents your organization. You will have a one-to-one relationship between tenants and organizations. The reason for this is that every tenant has a single Entra ID associated with it. Entra ID is the directory that will store all of your users, groups, and everything related to authentication, authorization, and security in general.
I’m going to come at this from another angle. When you create your organization’s existence in Microsoft, you’re going to create something called a tenant. This will either be done by creating your first Microsoft 365 account or creating your first Azure subscription. By creating this tenant, you’ll automatically create a single Entra ID directory linked to that tenant. You can manage Entra ID through one of several administrative consoles including: Microsoft 365 admin, Azure portal, or Entra ID admin. All of these are available whether you’re using Microsoft 365, Azure, or both.
If your organization is already a Microsoft 365 or Office 365 organization, this same tenant/Entra combo is the same one you’ll use for Azure.
Comments