Create GitHub Actions Workflow
Now it’s time to deploy our website to our Static Web App resource using GitHub Actions. If you’ve been following along, so far we’ve done the following:
- Created your GitHub repositories and cloned them to your local computer
- Created a new Static Web App resource with Terraform
- Run the static website on your local computer.
- Pushed all the changes you made back up to your GitHub repo.
And as you recall, we haven’t put our custom website content on our Azure Static Web App resource so it’s using a temporary default website. We’re finally going to deploy the site that our designer created to our Azure Static Web App resource. The way this works is that we create a CI/CD pipeline with GitHub Actions known as a workflow that will take our website code and deploy it to our Static Web App. And this is way easier than it sounds.
Create Static Web App API Token Secret in GitHub
We’re going to create a GitHub Actions workflow in the next section, but first we’ll need a way for our workflow to authenticate to our Static Web App resource so that GitHub Actions can deploy our website to it. Our Static Web App has an API token that we can copy and add to our GitHub repository so that the workflow can use it for authentication.
For this one-time task, the easiest way is to get the token from the portal.
- Go to the Azure portal and find your Static Web App resource in the scrm-webpub-prd-1 resource group. You can also search for
scrm-webpub-prd-1in the search field. - In the overview blade for the Static Web App, click the Manage deployment token button at the top.
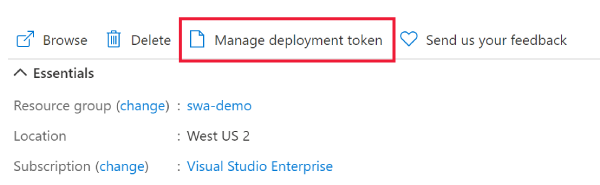 .
. - Click the button to copy
 the token.
Now that you have the token, you’ll need to create the secret in your scramoose-web-public repository. Follow the GitHub instructions for creating secrets for a repository.
- For the secret name, use
AZURE_STATIC_WEB_APPS_API_TOKEN. - For the secret value, paste the API token you copied from the Azure portal.
As you’ll see in a moment, this will be the value for the ${{ secrets.AZURE_STATIC_WEB_APPS_API_TOKEN }} variable in our workflow YAML below.
Create GitHub Actions Workflow
Now it’s time to create the workflow.
- Go to your scramoose-web-public repository in GitHub.
- Click the Actions tab at the top. If you haven’t yet created any workflows yet, it will take you to the page to create a new workflow. If you have already created any workflows, click the New workflow button.

- Click the link below the Choose a workflow header to set up a workflow yourself. You’ll be presented with a list of recommended starter workflows and you can search for the
azure static web appstarter workflow, but our workflow is customized enough that we want to create it from scratch. - Change the name of the file to
azure-staticwebapp.yml. (Or any name you want. It doesn’t matter, it’s just that the default name isn’t descriptive enough.) - Paste the code below into the editor.
- Click the Commit changes button, optionally change the commit message, and then click the Commit changes button again. Leave the Commit directory to the
mainbranch option selected.
name: Deploy web app to Azure Static Web Apps

on:
  push:
    branches: [ "main" ]
  pull_request:
    types: [opened, synchronize, reopened, closed]
    branches: [ "main" ]

env:
  APP_LOCATION: "/src"

permissions:
  contents: read

jobs:
  build_and_deploy_job:
    permissions:
      contents: read # for actions/checkout to fetch code
      pull-requests: write # for Azure/static-web-apps-deploy to comment on PRs
    if: github.event_name == 'push' || (github.event_name == 'pull_request' && github.event.action != 'closed')
    runs-on: ubuntu-latest
    name: Build and Deploy Job
    steps:
      - uses: actions/checkout@v3
        with:
          submodules: true
      - name: Build And Deploy
        id: builddeploy
        uses: Azure/static-web-apps-deploy@v1
        with:
          azure_static_web_apps_api_token: ${{ secrets.AZURE_STATIC_WEB_APPS_API_TOKEN }} # Get this from the Azure portal for the Static Web App resource
          repo_token: ${{ secrets.GITHUB_TOKEN }} # This is created automatically by GitHub Actions
          action: "upload"
          app_location: ${{ env.APP_LOCATION }}
          skip_app_build: true
          skip_api_build: true

  close_pull_request_job:
    permissions:
      contents: none
    if: github.event_name == 'pull_request' && github.event.action == 'closed'
    runs-on: ubuntu-latest
    name: Close Pull Request Job
    steps:
      - name: Close Pull Request
        id: closepullrequest
        uses: Azure/static-web-apps-deploy@v1
        with:
          azure_static_web_apps_api_token: ${{ secrets.AZURE_STATIC_WEB_APPS_API_TOKEN }} # Get this from the Azure portal for the Static Web App resource
          action: "close"
The ${{ secrets.GITHUB_TOKEN }} secret is created and managed automatically and dynamically by GitHub and you don’t need to do anything for that. Read more about it here.
Check Workflow
The workflow will began running as soon as you commit your changes to the YAML file. That’s because these lines ![]() in the YAML file tell GitHub to run this anytime changes are made to the main branch, and you just committed the changes of the workflow YAML file itself to the main branch (very meta 🤯).
in the YAML file tell GitHub to run this anytime changes are made to the main branch, and you just committed the changes of the workflow YAML file itself to the main branch (very meta 🤯).
on:
  push:
    branches: [ "main" ]
You can see if this workflow ran successfully by clicking on the Actions tab for your repo where you’ll see a list of the workflows.
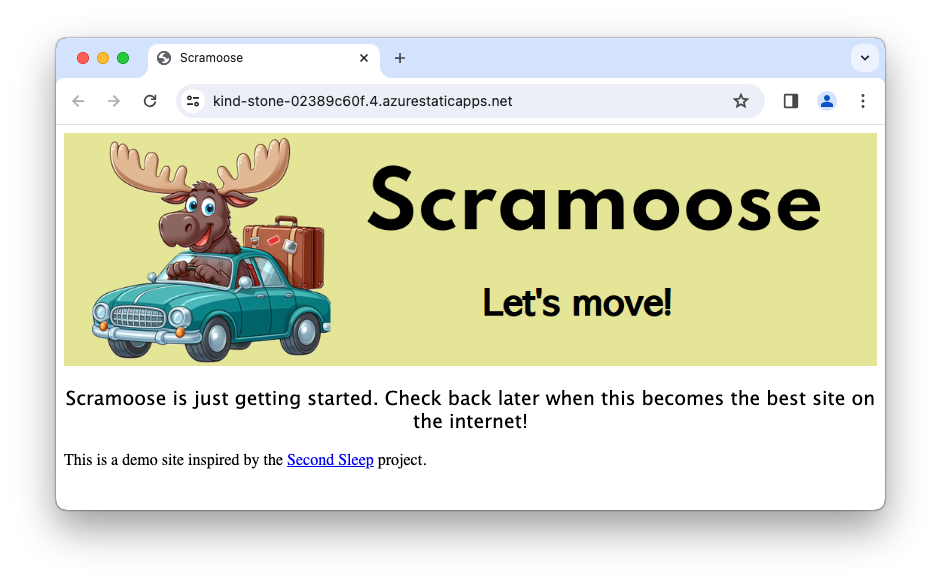
If you see a green checkmark next to the most recent workflow run, you’re good! Now go to the URL of your Static Web App that you got way back in our Terraform deployment, and see if our code is there.
Are We Done Yet?
No! There’s more to learn! I mean, we’re basically done, but check out the next post to see how we can use our Static Web App to preview changes.
Comments